Tutorial 3 – Extended 1:1 View Generator (Xtend, v0.2.0, deprecated)
In this tutorial we build a JAR file with a client generator implementing the Java interface. A client generator runs in the same JVM as SQL Developer and does not require a server side installation. Hence a client generator is immediately ready for use within all database connections.
In tutorial 2 we’ve written a generator in PL/SQL. We rewrite this generator now in Xtend. In this tutorial we use command line tools and simple text editors as common denominators. However, feel free to use the Java IDE of your choice.
1. Download Maven
Download Apache Maven 3.3.9 or later from here.
2. Install Maven
Install Maven as described here.
3. Create directories
We use a standard Maven directory layout. Let’s create the directory structure for our POM and Xtend source file.
On *nix open a terminal window in any directory and enter the following command:
|
1 |
mkdir -p tutorial-3/src/main/java |
On Windows open a command window in any directory and enter the following command:
|
1 |
mkdir tutorial-3\src\main\java |
4. Create POM
Save the following POM as pom.xml in the previous created directory tutorial using UTF-8 encoding without BOM.
|
1 2 3 4 5 6 7 8 9 10 11 12 13 14 15 16 17 18 19 20 21 22 23 24 25 26 27 28 29 30 31 32 33 34 35 36 37 38 39 40 41 42 43 44 45 46 47 48 49 50 51 52 53 54 55 56 57 58 59 60 61 62 63 64 65 66 67 68 69 70 |
<project xmlns="http://maven.apache.org/POM/4.0.0" xmlns:xsi="http://www.w3.org/2001/XMLSchema-instance" xsi:schemaLocation="http://maven.apache.org/POM/4.0.0 http://maven.apache.org/xsd/maven-4.0.0.xsd"> <modelVersion>4.0.0</modelVersion> <groupId>org.oddgen</groupId> <artifactId>org.oddgen.plugin.extendedview</artifactId> <version>1.0.0-SNAPSHOT</version> <packaging>jar</packaging> <name>Extended 1:1 view generator</name> <description> Client generator example. Implements the OddgenGenerator interface and produces a jar file to be manually deployed into the SQL Developer extension directory. </description> <properties> <project.build.sourceEncoding>UTF-8</project.build.sourceEncoding> </properties> <dependencies> <!-- ordinary dependencies --> <dependency> <groupId>org.oddgen</groupId> <artifactId>org.oddgen.sqldev</artifactId> <version>0.2.1</version> <scope>provided</scope> </dependency> <!-- transient dependencies of org.oddgen.sqldev, workaround, see https://github.com/oddgen/oddgen/issues/24 --> <dependency> <groupId>org.springframework</groupId> <artifactId>spring-jdbc</artifactId> <version>4.3.0.RELEASE</version> <scope>provided</scope> </dependency> <dependency> <groupId>org.eclipse.xtend</groupId> <artifactId>org.eclipse.xtend.lib</artifactId> <version>2.9.2</version> <scope>provided</scope> </dependency> </dependencies> <!-- Build Settings --> <build> <plugins> <plugin> <groupId>org.eclipse.xtend</groupId> <artifactId>xtend-maven-plugin</artifactId> <version>2.9.2</version> <executions> <execution> <id>main</id> <goals> <goal>compile</goal> </goals> <configuration> <outputDirectory>${project.build.directory}/xtend-gen/main</outputDirectory> </configuration> </execution> </executions> </plugin> <plugin> <groupId>org.apache.maven.plugins</groupId> <version>3.5.1</version> <artifactId>maven-compiler-plugin</artifactId> <configuration> <target>1.7</target> <includes> <include>**/*.java</include> </includes> </configuration> </plugin> </plugins> </build> </project> |
All dependencies are available in public Maven repositories. For a real plug-in you just have to change the highlighted lines to fit your needs.
5. Create generator
Save the following client generator as ExtendedView.xtend in the previous created directory tutorial-3/src/main/java using UTF-8 encoding without BOM.
|
1 2 3 4 5 6 7 8 9 10 11 12 13 14 15 16 17 18 19 20 21 22 23 24 25 26 27 28 29 30 31 32 33 34 35 36 37 38 39 40 41 42 43 44 45 46 47 48 49 50 51 52 53 54 55 56 57 58 59 60 61 62 63 64 65 66 67 68 69 70 71 72 73 74 75 76 77 78 79 80 81 82 83 84 85 86 87 88 89 90 91 92 93 94 95 96 97 98 99 100 101 102 103 104 105 106 107 108 109 110 111 112 113 114 115 116 117 118 119 120 |
/* * Copyright 2015-2016 Philipp Salvisberg <philipp.salvisberg@trivadis.com> * * Licensed under the Apache License, Version 2.0 (the "License"); * you may not use this file except in compliance with the License. * You may obtain a copy of the License at * * http://www.apache.org/licenses/LICENSE-2.0 * * Unless required by applicable law or agreed to in writing, software * distributed under the License is distributed on an "AS IS" BASIS, * WITHOUT WARRANTIES OR CONDITIONS OF ANY KIND, either express or implied. * See the License for the specific language governing permissions and * limitations under the License. */ package org.oddgen.plugin.extendedview import java.sql.Connection import java.util.ArrayList import java.util.HashMap import java.util.LinkedHashMap import java.util.List import org.oddgen.sqldev.generators.OddgenGenerator import org.springframework.jdbc.core.JdbcTemplate import org.springframework.jdbc.datasource.SingleConnectionDataSource class ExtendedView implements OddgenGenerator { static val SELECT_STAR = 'Select * ?' static val VIEW_SUFFIX = 'View suffix' static val ORDER_COLUMNS = 'Order columns?' private def getColumnNames(Connection conn, String tableName, LinkedHashMap<String, String> params) { if(params.get(SELECT_STAR) == "Yes") { return #["*"] } else { val sortColumnName = if(params.get(ORDER_COLUMNS) == "Yes") "column_name" else "column_id" val sql = ''' SELECT column_name FROM user_tab_columns WHERE table_name = ? ORDER BY «sortColumnName» ''' val jdbcTemplate = new JdbcTemplate(new SingleConnectionDataSource(conn, true)) val columnNames = jdbcTemplate.queryForList(sql, String, tableName.toUpperCase) return columnNames } } override getName(Connection conn) { return "Extended 1:1 View Generator" } override getDescription(Connection conn) { return "Generates a 1:1 view based on an existing table and various generator parameters." } override getObjectTypes(Connection conn) { val objectTypes = new ArrayList<String>() objectTypes.add("TABLE") return objectTypes } override getObjectNames(Connection conn, String objectType) { val sql = ''' SELECT initcap(object_name) AS object_name FROM user_objects WHERE object_type = ? AND generated = 'N' ORDER BY object_name ''' val jdbcTemplate = new JdbcTemplate(new SingleConnectionDataSource(conn, true)) val objectNames = jdbcTemplate.queryForList(sql, String, objectType) return objectNames } override getParams(Connection conn, String objectType, String objectName) { val params = new LinkedHashMap<String, String>() params.put(SELECT_STAR, "No") params.put(VIEW_SUFFIX, "_v") params.put(ORDER_COLUMNS, "No") return params } override getLov(Connection conn, String objectType, String objectName, LinkedHashMap<String, String> params) { val lov = new HashMap<String, List<String>>() if(params.get(SELECT_STAR) == "Yes") { lov.put(ORDER_COLUMNS, #["No"]) } else { lov.put(ORDER_COLUMNS, #["Yes", "No"]) } if(params.get(ORDER_COLUMNS) == "Yes") { lov.put(SELECT_STAR, #["No"]) } else { lov.put(SELECT_STAR, #["Yes", "No"]) } return lov } override getParamStates(Connection conn, String objectType, String objectName, LinkedHashMap<String, String> params) { return new HashMap<String, Boolean>() } override generate(Connection conn, String objectType, String objectName, LinkedHashMap<String, String> params) { try { val tableName = objectName.toLowerCase val viewName = '''«tableName»«params.get(VIEW_SUFFIX).toLowerCase»''' val columnNames = getColumnNames(conn, tableName, params) val result = ''' CREATE OR REPLACE VIEW «viewName» AS SELECT «FOR col : columnNames SEPARATOR ", "»«col.toLowerCase»«ENDFOR» FROM «tableName»; ''' return result } catch(Exception e) { return '''Cannot create view statement, got: «e.message».''' } } } |
The implementation looks very similar to the final PL/SQL variant of tutorial-2. In difference to the PL/SQL interface we have to implement the Java interface completely. There is no default behaviour for getName, getDescription, getObjectTypes, etc.
Another difference is, that every method gets the active database connection as parameter conn. See lines 72 and 73 how this connection is used to access the database via Spring’s JdbcTemplate.
A further difference is that the getParams method returns a LinkedHashMap and the parameters are sorted by entry (See line 78). Hence no additional method to sort parameters is required.
But the most significant difference is the use of template expressions. The following screenshot shows the lines 110 to 114 in the Xtend editor within the Eclipse IDE:

On line 110 the template is initiated with tripple single quotes and terminated on line 114 with tripple single quotes. Within the template boilerplate text such as “CREATE OR REPLACE VIEW” is shown in grey background colour. Please note that the whitespaces before “CREATE OR REPLACE VIEW” are ignored. This allows a reasonable formatting of code. Xtend expressions are put in guillemets. For example «col.toLowerCase» on line 112. In this case the col variable of the for loop is converted to lower case using the standard java.lang.String method toLowerCase(). Xtend expressions give you access to the full Java stack and are compiled, this means better performance and less runtime errors.
6. Build JAR
Open a *nix terminal window or a Windows command window in the previous created tutorial-3 directory and execute the following command:
|
1 |
mvn clean package |
It will take a while to download all the dependencies into your local Maven repository. However, it will be faster for subsequent calls.
At the end of the build you should see a success message similar to the following:
|
1 2 3 4 5 6 7 |
[INFO] ------------------------------------------------------------------------ [INFO] BUILD SUCCESS [INFO] ------------------------------------------------------------------------ [INFO] Total time: 8.704 s [INFO] Finished at: 2016-06-21T13:21:42+02:00 [INFO] Final Memory: 48M/481M [INFO] ------------------------------------------------------------------------ |
After a successful build the directory structure produced by find . -type f -exec ls -lh {} \; | awk '{printf "%6s %s\n", $5, $9}' on a *nix system should look as follows:
|
1 2 3 4 5 6 7 8 9 10 11 |
2.6K ./pom.xml 4.2K ./src/main/java/ExtendedView.xtend 8.0K ./target/classes/org/oddgen/plugin/extendedview/ExtendedView.class 135B ./target/maven-archiver/pom.properties 50B ./target/maven-status/maven-compiler-plugin/compile/default-compile/createdFiles.lst 93B ./target/maven-status/maven-compiler-plugin/compile/default-compile/inputFiles.lst 6.1K ./target/org.oddgen.plugin.extendedview-1.0.0-SNAPSHOT.jar 229B ./target/xtend/stubs520839322117911/org/oddgen/plugin/extendedview/ExtendedView.class 68B ./target/xtend/stubs520839322117911/org/oddgen/plugin/extendedview/ExtendedView.java 9.2K ./target/xtend-gen/main/org/oddgen/plugin/extendedview/.ExtendedView.java._trace 8.1K ./target/xtend-gen/main/org/oddgen/plugin/extendedview/ExtendedView.java |
On line 7 you see the resulting org.oddgen.plugin.extendedview-1.0.0-SNAPSHOT.jar in the target directory. It’s just 6 kilobytes since all dependent libraries are tagged as “provided” in the POM.
On line 11 you see the intermediate Java file which has been produced from our Xtend source and was used by the Java compiler.
7. Install JAR
SQL Developer 4.x is installed by extracting an archive file to a location of your choice. The location of the installation directory is neither standardised nor registered somewhere. However, typical locations of the SQL Developer root directory are:
- On macOS (fka OS X):
- /Applications/SQLDeveloper.app/Contents/Resources/sqldeveloper
- $HOME/Applications/SQLDeveloper.app/Contents/Resources/sqldeveloper
- On Windows
- C:\app\sqldeveloper
- %HOME%\app\sqldeveloper
- C:\Program Files\sqldeveloper
- C:\Program Files (x86)\sqldeveloper
We call this directory from now on SQLDEV_HOME. The SQL Developer extensions are stored in SQLDEV_HOME/sqldeveloper/extensions which we call SQLDEV_EXTENSION_HOME from now on. You find the extension oracle.sqldeveloper.worksheet.jar in this directory. Searching for this file might be another option to identify the location of SQLDEV_EXTENSION_HOME.
To install the client generator copy the previously created org.oddgen.plugin.extendedview-1.0.0-SNAPSHOT.jar file into SQLDEV_EXTENSION_HOME. For example
on macOS:
|
1 |
cp $HOME/tutorial-3/target/org.oddgen.plugin.extendedview-1.0.0-SNAPSHOT.jar /Applications/SQLDeveloper.app/Contents/Resources/sqldeveloper/sqldeveloper/extensions |
and on Windows:
|
1 |
copy %HOME%\tutorial-3\target\org.oddgen.plugin.extendedview-1.0.0-SNAPSHOT.jar \app\sqldeveloper\sqldeveloper\extensions |
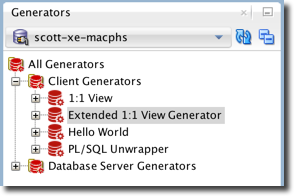
You do not need to restart SQL Developer, just open or refresh a connection in the Generators window and the new client generator should show up as in the following screenshot:
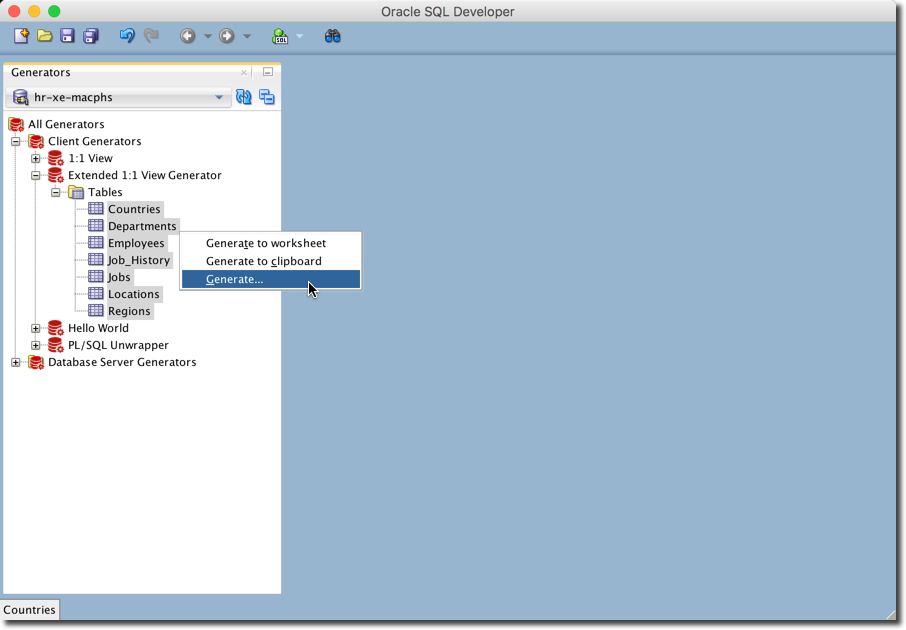
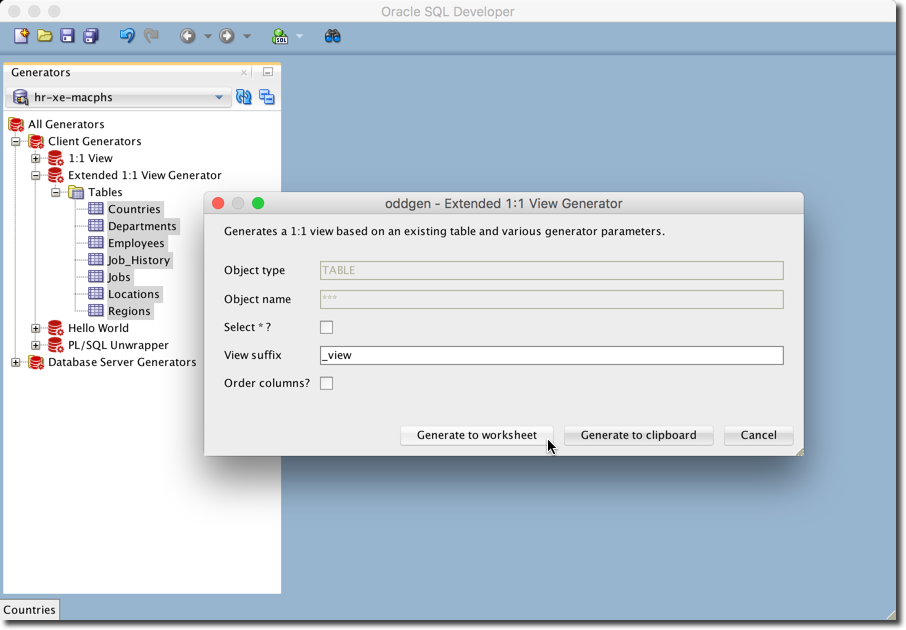
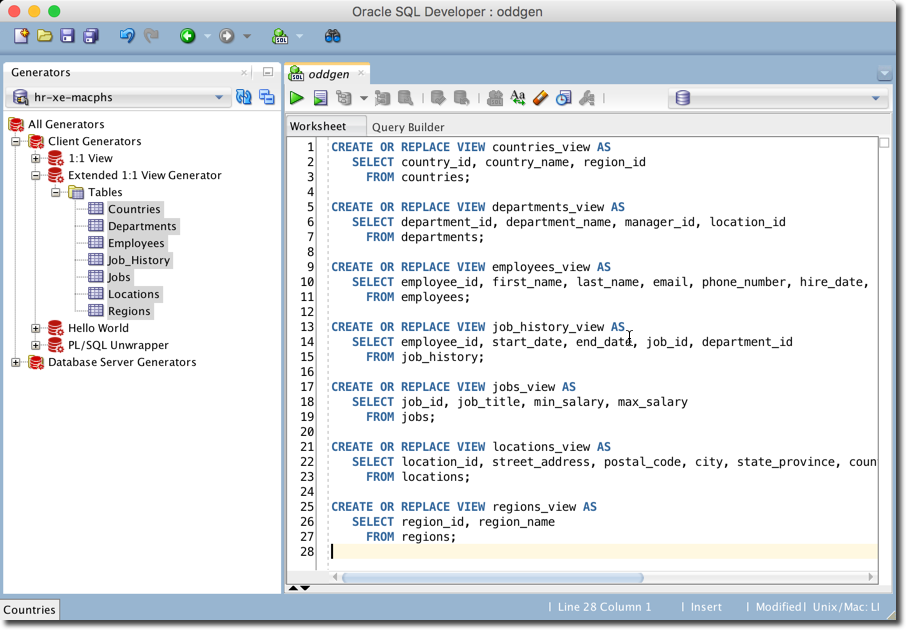
8. Generate from user HR
Establish a connection to any user in the database such as the demo user HR and generate the views as shown in the next images.